
Wavy Lines effect (Click the image to see it bigger)
Something not too different from yesterday, using a Patter Overlay to create a text effect. There are a bunch of different things, and another use of the Hard Mix Blend Mode. Read on for the details and how to download the style.
The Text effect
Perhaps I should post more pictures, but I hope that the above together with some info in text should be enough to explain how to recreate the pattern.
- I began with the pattern created yesterday, so see yesterdays post if you want to follow along, otherwise just create a new layer with a black rectangle that's the size of half the overall image and jump to step 4 below.
- Next I used the magic wand to select the black rectangle, and cut it. That filled the background with white.
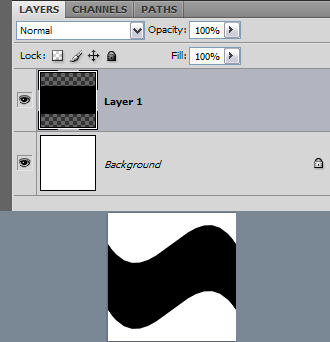
- After that I pasted the rectangle, thereby creating a new layer, this is the stage depicted in the Layers panel in the above image.
- Using Ctrl + T I brought up the Transform controls and after right-clicking I selected Warp from the pop-up menu.
- I selected "Flag" from the "Warp" menu and pressed the Enter key to accept the Warp which made the image look like the lower part of the image above.
- Finally I defined the image as a pattern, see yesterday's post for more info if you don't know how to do that.

Stroke settings
Again, a basic stroke, you've seen it before, and you'll see it again. No need for me to repeat what I've said several times before. I will say that the color is a dark grey rather than a black though, and for completeness sake I'll also mention that the Size is set to 2px.

Bevel and Emboss settings (Click the image to see it bigger)

Pattern Overlay settings
Notes about the background:
It's literally the same base background, the only difference is that there is a Layer Style with a Gradient Overlay on the Hue and Saturation adjustment layer. Black to White, Linear, 80% Opacity, 86% Scale. And most importantly: The Blend Mode is set to Hard Mix.


No comments:
Post a Comment