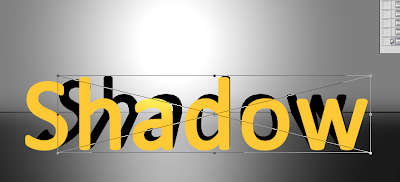
Shadow effect (Click the image to see it bigger)
A simple name, and some simple layer styles, but what really makes this effect are a couple of Smart Objects. Read on for info on how I created this shapeshifting shadow, as well as to be able to download the PSD file (just a style file doesn't really cut it for this effect).
Bent shadow effect
The Layers panel
Four layers are needed for this image, starting with the background. It's the same as on the Shadow Create image, and the main thing about it is that it's got a clear horizontal line that gives the illusion of it being a wall and a floor meeting somewhere in the middle area of the image. Next I created the text, and converted it to a smart object (the "Text" layer above). That smart object I then copied twice, once for the wall part of the shadow and once for the floor part. It's important to copy the layer rather than e.g. choosing New Smart Object via Copy, because the latter breaks the link between the smart objects (or rather creates a new smart object "original", e.g. the file that's embedded in the PSD and that you edit when editing the contents of the smart object), while copying the layer makes all the smart object representations (i.e. the layers in your document that all uses the original) use the same "original". That way you can edit it by double-clicking either of the smart object layers and all layers are updates, making this a reusable effect.
Screenshot of the scale transformation of wall layer (Click to see bigger)
This is the "wall" layer, see below in the info for the "floor" layer to get most of the info, but here I'll mention that it's got a Scale Transformation applied. To get to that press Ctrl+T and then use the Shift+Alt keys while scaling with the mouse to scale proportionally (Shift) from the Center (Alt).
Screenshot of distortion transformation of floor layer (Click to see bigger)
This is the layer right above the background in the Layers panel screenshot above, as you can see there it's got a simple layer mask hiding the part of the layer that goes over the "wall" part (the wall part of the shadow has got the same mask inverted hiding the "floor" part and showing the wall part). It's also got a simple Color Overlay (the default, but with the color set to black), and most importantly a Distort transformation applied. You get to the transform controls by pressing Ctrl+T (Cmd+T on Mac as far as I know), and then in this case choose Distort. To know how to distort the shape I used the wall shadow layer as a guide to how much to distort the floor layer to make it look like a real shadow, in perspective, going from the text to the wall.
Finally I scaled the "Text" layer down a bit to fit the front end of the "floor" layer. It's got a simple Gradient Overlay to highlight the area corresponding to the highlight in the background. I've done similar things already, and you can check it out in the PSD file below, so I'm not going into details on that. If something is unclear and the PSD can't help you figure it out, please comment and let me know.
(Click to see the image bigger)
As I said, the effect is very reusable, so once you've got it set up all you need to do to use another text is to double-click the "Text" layer, edit it, and save.


No comments:
Post a Comment